Monday, 29 November 2010

Script - The Hostage


THE HOSTAGE’ – “Always lock your doors.”
SCRIPT.

January 17th 2011

Woman enters house
(Sound of door closing)
Woman in bathroom
(door slam)
Woman – (wiping her face in the mirror) “Hugo, is that you? I’m in the bathroom…”
Phone rings
Woman – “Hello … (dogs barking) ah bloody dogs, hold on …”
Woman enters the next room. Husband on the phone.
Woman – “Sorry … Hello?”
Husband – “Hi sweetheart its me, Im gonna be late Im stuck on the M25 and ..”
Woman – “Wait, (confused) … Didn’t you just …? Who’s in the house …”
(phone drops)
Husband – “What are you talking about, Zara, whats wrong? Hello .. Hello?”
Woman – (under her breath) “Oh my god …” turns.

Shot Lists


1.      Establishing shot of house, then we see car pull up.
2.      Close up Shot of her shoe sliding out of the car.
3.      Close up tracking shot of close up of her shoes walking up to the front door.
4.      Medium close up of her side, unlocking the door.
5.      Close up of hand unlocking the door. Door opens.
6.      Close up of bag and keys onto work surface.
7.      Tracking shot of family pictures.
8.      Close up of hands turning shower on
9.      Wide shot of shower filling up with steam
10.  Medium shot of phone ringing.
11.  Focused on phone, we see her approach the phone.
12.  Background mid shot of her on the phone. (dialogue)
13.  High angle shot of dogs barking. POV
14.  Medium shot, her reaction, confused, shadow in the background.
15.  High angle shot of dogs barking. POV
16.  Medium shot, of her on the phone shadow gone.(Dialogue)
17.  Wide shot of her entering another room (muffled sound of dogs barking)
18.  Medium close up of her on the phone (realises its her husband)
19.  Extreme close up of phone falling out of her hand.
20.  Match on action shot, floor close up of phone. Phone falls into frame.
21.  Her reaction shot, medium close up.
22.  Over the shoulder shot of the killer, facing womans back. She turns and gasps.

Props List


Outside Establishing shots in Ewhurst Place fancy cars parked outside, signifying money.
Ferrari 599
Teds House in Cornhill for the inside shots. E.g. Kitchen, warm colours, symbolizing happiness of the couple. Open plan exposing the area more.

Teachers bathroom, in Hurtwood. Modern with nice ceramics symbolizing expensive taste.

Woman in dressing Gown - Shows sexiness and lust.

Picture of the couple, shows their happiness and gives the audience more information.

Big engagement ring - highlights their wealth.


TEAM ROLES

DIRECTOR - HOLLY FINLAY
PRODUCER - PAULA RIEMANN
CINEMATOGRAPHER - MEHRAM KARIMI
SOUND ENGINEER - EMILY BENSON RHODES

Storyboards 'The Hostage'


Friday, 19 November 2010

Analysis of the Opening Sequence of 'Shutter Island'.


During one of our lessons, we looked at the opening sequence of Shutter Island directed by Martin Scorsese. I was ableto pick up on the genre of the film being a Thriller due to the visual and aural signifiers that show this. The following shows the signifiers:-
Visually ...
  • Dark Lighting
  • Thunderstorm
  • lots of woodland areas shown in the establishing shot.
  • 'C' prison is a darker colour than the others, representing a sinister approach.
  • Strange, mad people shown in chains.
  • Trench coats and hats costume, highlighting mystery and investigation.
  • Mad man smiling juxtapposes to the shackles on his feet.
  • Lots of security and guards holding guns, highlights dangerous area.
Aurally ...
  • Dialogue referring to the situation - "Why is everyone so edgy?"
  • Strings music
  • Deep bass murmurs.
The opening sequence establishes the narrative to show:-
  • Someone has gone missing
  • Wife has died.
  • Boat to island.
  • Storms coming.
  • Island is dangerous.
We are introduced to the characters subtly throughout the opening, through various ways. We know alot about the charcters already through their dialogue and just from the denotation of the scene.
For example;-
  • Leo and Bob on the boat = police officers.
  • Policemen on shore work for the prison. We know this due to their unifrom. Highlights the danger of the place.
  • Mad patients are shown to us gradually. The chains and shackles highlight the danger of the characters.
                     

Narrative and Character Theories

EQUILIBRIUM=DISRUPTION=COMPLICATION=RESOLUTION=NEW EQUILIBRIUM

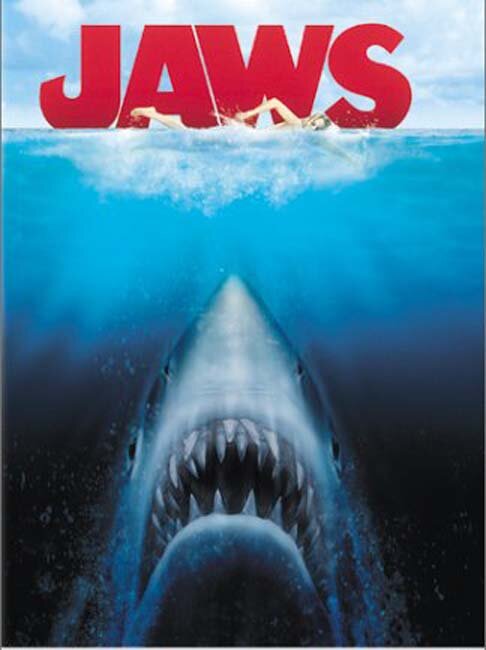
Equilibirum Setting of the Film Jaws.

E= Preparing for 4th of July celebrations. All is well on the beach.
D= Find remains of womans body, eaten by shark.
C= Do they close the beach or keep it open? Another Attack Occurs.
R= They decide to find the shark, kill it, and keep the beach open.
NE= Shark and hunter are killed. Back to normal, yet there is a new equilibirum as there has been some affect upon the people of the area.


Vladimir Propps Theory was that there is a particular set of characters within a film.
The Hero= the one who saves the day
The Villain = the evil one who causes disequilibrium
Side Kick/ The Helper= a person who helps the hero.
The Victim = at the mercy of the villain
The Donor = someone who has something special which will help the hero.

This is highlighted in the film - Harry Potter & The Prisoner Of Azkaban

Harry Potter = Hero
Voldemort= Villain
Ron & Hermione = Helpers
Serious Black = Victim
Dumbledore = Donor

Denotation & Connotation of Horror Film Stills

I explored denotation and connotation by looking at some stills from a variety of well known Horror films. Denotation is the literal analysis of a picture, by saying what you see in the picture without giving opinion. Conotation is where you give your opinion and give your interpretation of the image.
Just like the following:-


Still from Scream
Denotation
Person in white mask, black cloak/cape holding a knife looking through window at a blond woman on a phone.
Connotation
Knife symbolises danger, woman may be on phone to police, Mask covers his identity. Perhaps a murderer breaking into the womans home. Mask hides idnetity therefore creating fear of the unknown.

Still from Pyscho
Denotation
Lady in shower, wet due to water. Open mouthed. Black and white still.
Connotation
May be being shocked in shower, screaming naked highlights her vulnerability and how she has no protection. Scared look on her face. Black and white still symbolises old movie.


Still from Gothika
Denotation
Woman in tracksuit in front of wall with red writing on it. Reading 'Not Alone'.
Connotation
'Not Alone'symbolises how she may not actuallyp hysically be alone or mentally. Highlighting mental problems or to contradict that she isnt the only person in the still. Her tracksuit highlights simpleness. The red writing may be perceived as blood, therefore showing murder and death.


Still from Friday the 13th Denotation
Car Park shot of emptyness, long black coat on man in distance. Woman shot from behind, she is closer to camera.
Connotation
Empty car park creates eerieness, woman closer to camera highlights how she may be the protagonist. Unknown danger of man in the background.


Still from The Exorcist
Denotation
Girl with scabby and rotting face. long red hair and glaring eyes. White laced dress.
Connoatation
White nighty contrasts her red hair. Red hair symbolises danger. White dress highlights innocence and child like nature.


Still from The Ring
Denotation
White room, white dress. Microphone on the floor. Black shoes, and long black greasy hair.
Connotation
Whiteness highlights innocence and in the background surroudings, a clinical environement. e.g. hospital, mental institute. Black hair highlights darkness within a character. Dirtiness of hair also symbolises how she is unkempt.


Still from The Omen
Denotation
Small boy in black suit with a white shirt and black hat. In a graveyard with white crosses.
Connotation
White symbolises good. Black suit contrasts to grave stones. Signifying danger, crosses show religion.


Still from It
Denotation
Man with a painted face, with red hair and sharp teeth.
Connotation
White face symbolises a 'Clown'. Red hair shows danger - contrasting with the white face, when white usually symbolises innocence. Clowns also symbolise fun and happiness which juxtapposes with the sharp teeth. making him look threatening and dangerous.


Still from Halloween
Denotation
Man with a white face, looking over a banister holding a large knife
Connotation
High up shot shows his imprtance and hierachy. Knife= danger.


Still from H20
Denotation
Man with white mask, mask looking through window to woman with her mouth open.
Connotation
Woman is shocked or scared by seeing him. Highlights his danger. Yet she is protected by the steel. Rounded wondow symbolises a submarine. Blue colouring highlights the movie name of H20 which is the chemists name for Water. Also teaching the audience that it may happen underwater.

Horror Movie Conventions - Opening of Scream

Conventions are effects used to build tension and to show that a film is of a horror or thriller genre. I explored the opening sequence of the Wes Craven film, 'Scream'.
Here are some examples which I noticed:-

  • Night time
  • Knifeboard
  • Establishing shot of house in the middle of nowhere.
  • Woman alone
  • Popcorn popping
  • Blank TV
  • Sound of locking doors - danger is impending
  • Lights are off
  • Big empty house - more places to hide
Sounds foud within a thriller/horror are used to create fear, tension and suspense.
Non diagetic sounds are added later to reinforce fear and tell us when to be scared.
Including the following :-
  • Telephone ringing
  • Dogs Barking
  • Sounds of the wind blowing
  • Creaking of doors and swing in the garden.
  • Violin music/ strings
Characters found within a Thriller/ Horror

  • Stupid blonde woman - conforming stereotype
  • Innoncence
  • Were expecting her to die
  • Therefore we have little sympathy for her
Shot Choices
  • Tracking Shots
  • Contage shots - shot at a tilt. (Dutch tilt)
  • Zoom to close up and reaction shot.

Wednesday, 17 November 2010

Ideas For Thriller + Mise-en-scene + Camerawork

Idea 1 - Babysitter alone in house, stalked through phone calls.
Idea 2 - Wife plotting to kill her husband.
Idea 3 - Woman answers door to killer pizza delivery guy.
Idea 4 - Woman alone in house, goes to get something from pool house at the bottom of the garden. to find body.

At the moment my main focus is on idea 4. It is a very simple scene yet could be made very thrilling. Firstly, there is an establishing shot of the house. The house will be large and quite extravagant, highlighting how they may be quite wealthy. Then there will be classical music playing softly in the background, perhaps highlighting intelligence and higher class. Then the sound stops as the phone begins to ring in a medium close up with the camera focused just on the phone ringing. This will be used to shock the audience and to create suspense. She answers the phone, then hangs up. As she walks away, there is a shot of her from behind walking slowly turning towards the phone in suspicion.The phone rings again and this time its her husband. This highlights the fluctuation of suspense throughout the opening sequence. She talks to her husband on the phone, then looks out the window and through the blinds with a shot from her point of view and her looking through the blinds. Awaiting her husband to come home. Then there is a shot of the taps running. The bath symbolises how she is vulnerable and as she will be naked, its a sign of no protection. Whilst she is in the bath, she hears the door slam. Again another manoeuvre to make the audience jump in suspense. Then there will be a fast paced shot of a medium close up of her face, to see her reaction. She gets out of the bath to find no body home, there will be a tracking shot of her walking down the stairs. Although she is expecting her husband, she is still cautious when he doesn't respond to her calling him. She goes into the kitchen and takes a knife from the counter in fast paced jump cuts although she is tip toeing around the house. this will help to speed the scene up as well as keep the intensity. The knife symbolises how she is protecting herself from danger, or she is dangerous. She is only in her towel at this point. She is walking around the house and see's the back door open, there is a shot of the door open, then a shot of her looking out of the doorway the a reverse shot. We see her in several shots as she picks up the phone from the handset ready to call someone. This again subverts the stereotype of women within horror films being stupid by not just calling the police straight away. Then she goes to the back door and shouts her husbands name. There is still no answer. again creating more suspense. As she turns away she walks into the arms of the killer and there is an over the shoulder shot of the killer. she drops the phone to the ground and thats in a close up as we are able to hear voices on the line. Scene finishes.

Friday, 12 November 2010

Prelim Post Production

A few weeks ago, I was taught in one of my lessons how to use the programme Final Cut Server. Final Cut Server is a computer programme created by Apple Mac to put together shots to produce a film, which looks liek something in the shot below. At first I found using this prgramme very complex, but after a few attempts it was actually rather easy.

The process starts with uploading our clips onto Final Cut, then watching them to find the ones with mistakes or tthe clips which fitted our sequence best. all the best clips were put into a log bin, the log bin helps to separate the clips as well as on an organisation level, as having this folder makes the clips easily acessible.  it was important that we chose the better shots, as because it was our first trial of filming, there was obviously going to be lots of mistakes. So we tried to cut down some clips with background noise or extra talking, to make the scene lookk more professional. this helped us to find the best fitting cuts to build a scene which really worked.

Whilst using this, I had to remember to use continuity editing. I had to ensure that the scene made sense and flowed well. I also had to remember to fit the sound over the clips in the correct moment otherwise it didnt fit. Then I had to choose the most relevant shots, to build a scene and to help the film flow smoothly. This was to manipulate time and space in the narrative. I then had to put together the most appropriate shots to help the audience to side with the protagonist and the antagonist. The shots have to appear in a particular order, so that the audience can have some background understanding of the scene. My film showed this, by showing the antagonist walking along into the room, opening the door then closing it behind him. Then the protagonist was sat in the same room, which the antagonist later enters, holding a gun. Just having this simple 30 second clip, tells the audience that the man is the antagonist, as he looks threatening. Then the audience understands that he is dangerous. Just as the woman is sat holding a gun, this gets the audience to think, whether she is the antagonist as she is going to shoot the other subject, or she is perhaps the protagonist because she is protecting herself with a gun.

After this, each of the special chosen shots were put onto the storyboard. the storyboard worked as a timeline which would fit each of the clips together. Once we had dragged them onto the story board in the correct positions, we had to make sure the background sound was in time with the movement of the shots. In my sequence we had more screen time on the protagonist as we wanted to highlight how she is good and how her reactions are important. Then the antagonist had less screen time. Although, in the editing, we made the cuts between each of them fast paced to show tension between the charcters. With a few single screen shots of the revolver, highlighting again the danger within this scene.

The overall editing turned out very well. The scene looked great in the end. But I noticed as we were watching it through that I had left a flashframe. This means there was a second where the scene goes black inbetween scenes.This means that the clips are not directly next to each other. Therefore I had to go back and pull the clips closer together. It is very hard to notice, but through the eyes of an expert its very obvious. If I had just left it, it would have looked like very poor editing. 

Overall I really enjoyed using the programme and now that I have learnt from my mistakes it will be a lot easier to use. But it is a very useful prgramme and I will definitly be using it in the future.


Wednesday, 20 October 2010

Mistakes and Recoveries Using the Camera

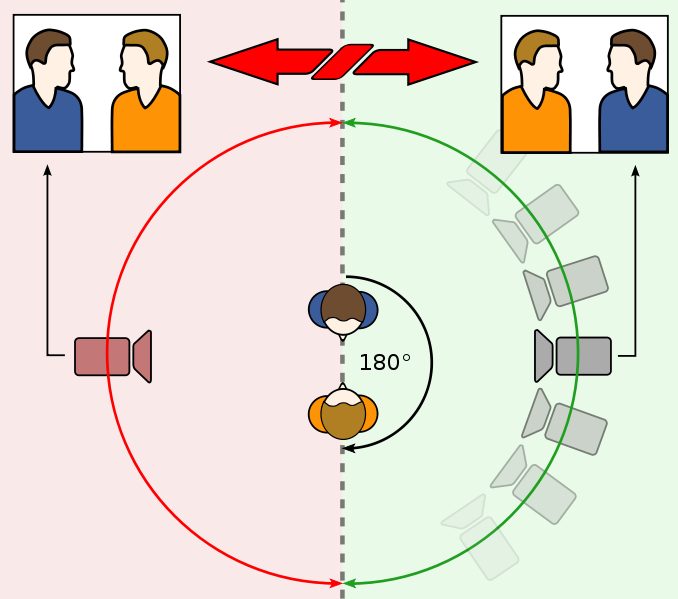
During our preliminary shoot, I made several mistakes. Firstly, I tried to shoot past the 180 degree line. It was spotted by a member of my group. I was finding it really hard to grasp where I was going wrong and why we couldnt go past the line. But I then learnt that it was because it messed with the continuity and caused confusion for the audience. Once I had learnt this, I was able to pick up on the 180 degree rule really well. The 180 degree rule is shown in a diagram, like this one.


During the shoot, I really enjoyed being able to shout out Industry terminology whilst filming.
Tems such as :-
Standy By/ Standing By - prepares the team into position for the take. The assistant director calls 'stand by' and the response tells them that everyone is prepped.
Turn Over/ Turning Over - Also could be said (Roll Film, Rolling etc.) This is when the director tells the camera man to start filiming. A few seconds of film is then run to get the camera running properly. This can also be referred to a 'Lead In'. Aftrer announcing this, the camera operator will respond saying 'rolling' representing that the camera is up to speed.
Action! - This is the cue for the actors to start performing, and the crew to start work.
Cut! - this is the cue for the camera to stop rolling and actors to rest. Industry experts believe that the camera operator does not cut before being told.

Overall I really enjoyed using the camera, although it took alot of time and patience. It is a huge contrast from the still shooting camera and has much more versatility. But is of course, far more complex. But once the technique is learnt everything is a lot easier. But I really enjoyed the experience as it really taught me what a set would be like and what to expect. It was really exciting and using the terminology and filming jargon really set an atmosphere.

Using The Camera


In our filming, we used a Sony DV180. Like the one in the picture below.

We used this camera to produce shots such as 'close ups', ' medium wide shots' and 'establishing shots'. These were all used to create tension within the audience or to highlight aspects of a scene. We also used the establishing shot to show where we were location wise. We also had to take into account the compositions of the shots. Such as rule of thirds and the 180 degree rule. I also learnt to be cautious when filming to not have too much space or too little space above the subjects head. As well as this, I learnt how to be wary of too much space between the subjects as it looks bare and distracts the audience. This taught me to move objects away from out of the background. Continuity is also a very important factor, as it makes a huge affect on the audience. Therefore we had to remember to keep the background the same in each shot. On a few occassions I had to retake a few shots because of this. Some of the shots we use are like the ones below. These shots are important because without them, it confuses the audience. Or people lose the plot of the film due to distractions in the background or blank spaces.

CLOSE UP

MEDIUM WIDE SHOT

ESTABLISHING SHOT


Monday, 11 October 2010

Camera Operation and Functions

Last week, I was introduced to using a proper recording camera for the first time. I have used cameras before, but nothing as professional as this. There were also many functions and settings which I was unaware of which can really affect and alter the image. Firstly, I learnt about the timecode. Which is found in the right hand corner of the recording screen. Such as the one in the image below.This is read from the left, starting in hours, minutes, seconds and frames. Within every second there are 25 frames. This is the amount of times the camera is taking a picture, which creates motion. In the image below the 33 min symbol is showing the amount of time left to record on film.


I also learnt about white balancing. This is a small button found on the side of the recording camera. This helps the camera absorbs the right wavelengths of light, making the colours look as if they should, to the human eye. To do this, firstly we have to find something white, such as a wall or a piece of paper. I used a white board in the classroom, then pressed the white balance button which helps to blance the light correctly.


I also used zoom and focussing. this can be a very tough task as you have to turn both handles at the same time. Although once understood, alot easier. You have to do this to be able to focus on the subject and make the image look clear. When there is movement within a scene, such as the subject walking towards the camera, you have to focus on the subject and turn the zoom at the same time.

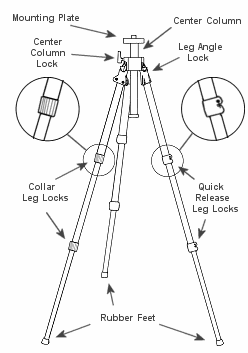
Then we learnt how to set up our tripods, and tightening the bubbling effect.first we had to lengthen or shorten the legs on the tripod to the appropriate size and height. we had to do this by twisting the handles on the legs and then an inner leg would slide out. looking something a bit like this below.


The picture highlights the parts of the tripod we have used and also shows the jargon and language used to describe them, such as 'leg locks' and 'mounting plate'. The tripod was very easy to use. Although, everything got much harder when we had to sort out the bubbling. The bubbling is to make sure that the camera is balanced and steady upon the mounting plate. We did this by simply turning a small handle on the side of the mounting plate which releases and decreases the stability of the mounting plate. Then steadily adjust the mounting plate so that the center bubble is within the center circle.


PhotoShop

Whilst using Photoshop, I used lots of tools to manipulate the image and create it into something different from what it was previously. Firstly, I started with using the Lasso Tool, to be able to move and add parts of a picture into another picture or onto a back ground, as shown below.

From there, I used the Lasso Tool again, but using a different form of it. I used the Polygonal Lasso Tool, which makes cutting out the picture a lot more precise and easier to cut around a subject within a picture. This is because the cutting is using straight lines, rather than curved freehand lines. Therefore my picture came out much neater than before.

I found that during my first use of the freehand form of the Lasso Tool, was very frustrating and tedious! Especially when you got it wrong! Although after I tried again using the Polygonal form, I found it much easier as it was far more precise and faster.

The image below, was the third step of learning how to use photoshop. By altering the hue and saturation of the image to make it fit into a picture or to manipulate a photgraph. For example, in the photo below, we could use this technique to make it look as if there is a ghost, by highlighting the inner image. I did this by going to image-adjustments- brightness contrast or hue/saturation.


Overall after using many of the photoshop tools, such as font, to give a name to my picture, hue/saturation, brightness/ contrast, I was able to make an overall image such as the one below. I found photoshop very hard to use at the start. But after taking my time, and having some patience with it I was able to use it efficiently and it was able to help me create an overall image using basic tools which I will be able to master over a long period of time. Photoshop has a great purpose, as we are able to manipulate ordinary images to create an atmosphere or an image of something which is completely unreal. This helps the media, as we are able to portray and use these images to gain attention towards a subject or to interest memebers of the public from a basic picture.


Tuesday, 28 September 2010

What is a Thriller?

In our lessons we looked at the film 'The Usual Suspects'. We studied the camera, lighting and mis-en-scne of the film. we also discussed what constitutes a thirller...

  • There is usually a twist in the plot.
  • A hidden identity within a charcter.
  • Lots of violence
  • Good verses Evil. A 'good' guy and a 'bad'guy.
  • Flashbacks, to reveal previous information to the story, or to the crime.
  • Added audience information.
  • Dark lighting
  • Murder/Corruption
  • Deep, heavy drmatic music.
  • Criminals and Police
  • Death
  • Mystery
  • Lighting such as ambient - natural light, low and artificial, usually designed for the film.
  • Low or high key lighting depending on what type of film your watching. (Film Noir)


Also in our lessons, we denotated and connotated the main promotional image.
we picked up on things such as 
  • 5 men in a police line up.
  • All dressed differently
  • One is in a cream suit
  • They are all various heights
  • No one is smiling
  • Man on the end is grsping his arm
  • Man dressed in leather has an agressive stance.
  • Horizontal lines behind them
  • Tallest man is in the middle (pyraid lik,e shape)
  • Red font title
Connotations for the Denotations
  • Police line up, signifies there in trouble.
  • They are all in the same situation, as they are all stood together
  • The cream suit guy, looks different to the others.
  • Lighter coloured suit symbolises innocence.
  • Red font represents danger
  • Holding arm for discomfort.
  • Pyramid of Power ... Hierachy between the charcters.

Photography and Image Manipulation

Photography brings a visual language that is universal in understanding. We must then understand its vocabulary which consists of shapes, textures, patterns, lines, colours, shade of light to dark and sharp to blurry images. Just as we must learn to arrange words in a coherent order in order to make sense when we write or speak, so too must we put visual elements together in an organized manner if our photographs are to convey their meaning clearly and vividly.
Composition means arrangement: the orderly putting together of parts to make a unified whole; composition through a personal, intuitive act. However, there are basic principles that govern the way visual elements behave and interact when you combine them inside the four borders of a photograph. Once we have sharpened our vision and grasped these basic ideas of principles, then we will have the potential for making our photographs more exciting and effective than ever before.

I have learnt how to use photoshop. At first, it was really hard to get to grips with, but after being shown what to do I was able to just get on with it. I chose a few pictures, then downloaded them into photoshop. I learnt how to move the image around, by rotating them and cutting pieces of the picture out and pasting them into another. Finally, I adjusted the scale of the image, and edited the hue and saturation of the images to fit in with the contrast of the image I was pasting them into. So I  used a the promotional picture from the movie 'Up' and cut the main charcters face out. I then pasted it onto another picture from the film 'The Expendables' by replacing the the 'Up' charcters head onto Jet Li's head in the promotional picture of 'The Expendables'. I scaled the image to make it fit properly and not look out of proportion. From there, I went into editing and reduced the saturation of the picture. This then turned the image black and white. I then went into the contrast of the image, and brightened it slightly so that it fitted the image properly. The picture was then finalised and looked great.

About Myself

Hi I'm Holly,
I went to Woldingham School for girls, before Hurtwood.
I really enjoy Media, because its new and exciting and hopefully a future career path.
I really enjoy british films, especially gangster films...The Business.
Shane Meadows is a legend. I love his films, especially This Is England.
I live in North-West London near Wembley ... where I've seen Arsenal play and Oasis perform.
I share a house with my Mum and my sister and two dogs.
I have moved around constantly, growing up. I love it because I get bored quickly.

Tuesday, 19 January 2010

Analysis of character in the title sequence of 'Snatch'


During the title sequence of the film 'Snatch' directed by Guy Ritchie, we are introduced to the characters by seeing a small clip of their character in action, then freezing on a still of them in pop art with their characters name.

For example, as shown in the video above, their is a clip leading up the character Mickey. We are shown a wad of money being thrown at him then someone reaches to take it off him and he reacts aggressively, raises his hand to hit the other person. The scene then freezes and we see a pop art image of Mickey. This still highlights how he may be an agressive character or greedy and he is shielding his money. Although this could also show how he is positively protecting his money showing that maybe he is poor.

Overall the clip helps highlight the character and generally give us an impression of the character before we have even heard him speak or the film has even started.