I also learnt about white balancing. This is a small button found on the side of the recording camera. This helps the camera absorbs the right wavelengths of light, making the colours look as if they should, to the human eye. To do this, firstly we have to find something white, such as a wall or a piece of paper. I used a white board in the classroom, then pressed the white balance button which helps to blance the light correctly.
I also used zoom and focussing. this can be a very tough task as you have to turn both handles at the same time. Although once understood, alot easier. You have to do this to be able to focus on the subject and make the image look clear. When there is movement within a scene, such as the subject walking towards the camera, you have to focus on the subject and turn the zoom at the same time.
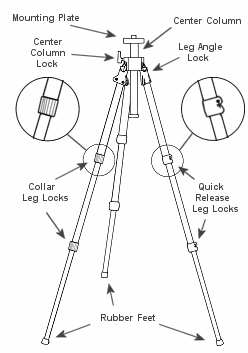
Then we learnt how to set up our tripods, and tightening the bubbling effect.first we had to lengthen or shorten the legs on the tripod to the appropriate size and height. we had to do this by twisting the handles on the legs and then an inner leg would slide out. looking something a bit like this below.

The picture highlights the parts of the tripod we have used and also shows the jargon and language used to describe them, such as 'leg locks' and 'mounting plate'. The tripod was very easy to use. Although, everything got much harder when we had to sort out the bubbling. The bubbling is to make sure that the camera is balanced and steady upon the mounting plate. We did this by simply turning a small handle on the side of the mounting plate which releases and decreases the stability of the mounting plate. Then steadily adjust the mounting plate so that the center bubble is within the center circle.

No comments:
Post a Comment