Wednesday, 20 October 2010

Mistakes and Recoveries Using the Camera

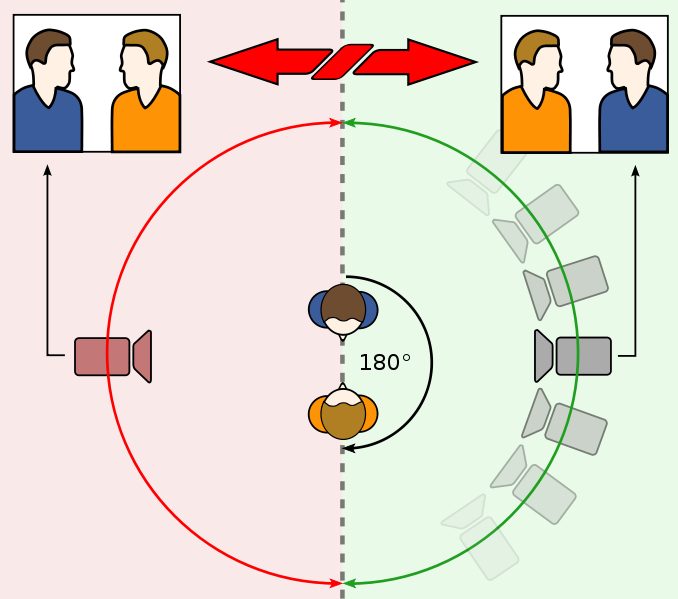
During our preliminary shoot, I made several mistakes. Firstly, I tried to shoot past the 180 degree line. It was spotted by a member of my group. I was finding it really hard to grasp where I was going wrong and why we couldnt go past the line. But I then learnt that it was because it messed with the continuity and caused confusion for the audience. Once I had learnt this, I was able to pick up on the 180 degree rule really well. The 180 degree rule is shown in a diagram, like this one.


During the shoot, I really enjoyed being able to shout out Industry terminology whilst filming.
Tems such as :-
Standy By/ Standing By - prepares the team into position for the take. The assistant director calls 'stand by' and the response tells them that everyone is prepped.
Turn Over/ Turning Over - Also could be said (Roll Film, Rolling etc.) This is when the director tells the camera man to start filiming. A few seconds of film is then run to get the camera running properly. This can also be referred to a 'Lead In'. Aftrer announcing this, the camera operator will respond saying 'rolling' representing that the camera is up to speed.
Action! - This is the cue for the actors to start performing, and the crew to start work.
Cut! - this is the cue for the camera to stop rolling and actors to rest. Industry experts believe that the camera operator does not cut before being told.

Overall I really enjoyed using the camera, although it took alot of time and patience. It is a huge contrast from the still shooting camera and has much more versatility. But is of course, far more complex. But once the technique is learnt everything is a lot easier. But I really enjoyed the experience as it really taught me what a set would be like and what to expect. It was really exciting and using the terminology and filming jargon really set an atmosphere.

Using The Camera


In our filming, we used a Sony DV180. Like the one in the picture below.

We used this camera to produce shots such as 'close ups', ' medium wide shots' and 'establishing shots'. These were all used to create tension within the audience or to highlight aspects of a scene. We also used the establishing shot to show where we were location wise. We also had to take into account the compositions of the shots. Such as rule of thirds and the 180 degree rule. I also learnt to be cautious when filming to not have too much space or too little space above the subjects head. As well as this, I learnt how to be wary of too much space between the subjects as it looks bare and distracts the audience. This taught me to move objects away from out of the background. Continuity is also a very important factor, as it makes a huge affect on the audience. Therefore we had to remember to keep the background the same in each shot. On a few occassions I had to retake a few shots because of this. Some of the shots we use are like the ones below. These shots are important because without them, it confuses the audience. Or people lose the plot of the film due to distractions in the background or blank spaces.

CLOSE UP

MEDIUM WIDE SHOT

ESTABLISHING SHOT


Monday, 11 October 2010

Camera Operation and Functions

Last week, I was introduced to using a proper recording camera for the first time. I have used cameras before, but nothing as professional as this. There were also many functions and settings which I was unaware of which can really affect and alter the image. Firstly, I learnt about the timecode. Which is found in the right hand corner of the recording screen. Such as the one in the image below.This is read from the left, starting in hours, minutes, seconds and frames. Within every second there are 25 frames. This is the amount of times the camera is taking a picture, which creates motion. In the image below the 33 min symbol is showing the amount of time left to record on film.


I also learnt about white balancing. This is a small button found on the side of the recording camera. This helps the camera absorbs the right wavelengths of light, making the colours look as if they should, to the human eye. To do this, firstly we have to find something white, such as a wall or a piece of paper. I used a white board in the classroom, then pressed the white balance button which helps to blance the light correctly.


I also used zoom and focussing. this can be a very tough task as you have to turn both handles at the same time. Although once understood, alot easier. You have to do this to be able to focus on the subject and make the image look clear. When there is movement within a scene, such as the subject walking towards the camera, you have to focus on the subject and turn the zoom at the same time.

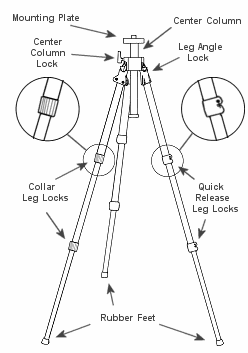
Then we learnt how to set up our tripods, and tightening the bubbling effect.first we had to lengthen or shorten the legs on the tripod to the appropriate size and height. we had to do this by twisting the handles on the legs and then an inner leg would slide out. looking something a bit like this below.


The picture highlights the parts of the tripod we have used and also shows the jargon and language used to describe them, such as 'leg locks' and 'mounting plate'. The tripod was very easy to use. Although, everything got much harder when we had to sort out the bubbling. The bubbling is to make sure that the camera is balanced and steady upon the mounting plate. We did this by simply turning a small handle on the side of the mounting plate which releases and decreases the stability of the mounting plate. Then steadily adjust the mounting plate so that the center bubble is within the center circle.


PhotoShop

Whilst using Photoshop, I used lots of tools to manipulate the image and create it into something different from what it was previously. Firstly, I started with using the Lasso Tool, to be able to move and add parts of a picture into another picture or onto a back ground, as shown below.

From there, I used the Lasso Tool again, but using a different form of it. I used the Polygonal Lasso Tool, which makes cutting out the picture a lot more precise and easier to cut around a subject within a picture. This is because the cutting is using straight lines, rather than curved freehand lines. Therefore my picture came out much neater than before.

I found that during my first use of the freehand form of the Lasso Tool, was very frustrating and tedious! Especially when you got it wrong! Although after I tried again using the Polygonal form, I found it much easier as it was far more precise and faster.

The image below, was the third step of learning how to use photoshop. By altering the hue and saturation of the image to make it fit into a picture or to manipulate a photgraph. For example, in the photo below, we could use this technique to make it look as if there is a ghost, by highlighting the inner image. I did this by going to image-adjustments- brightness contrast or hue/saturation.


Overall after using many of the photoshop tools, such as font, to give a name to my picture, hue/saturation, brightness/ contrast, I was able to make an overall image such as the one below. I found photoshop very hard to use at the start. But after taking my time, and having some patience with it I was able to use it efficiently and it was able to help me create an overall image using basic tools which I will be able to master over a long period of time. Photoshop has a great purpose, as we are able to manipulate ordinary images to create an atmosphere or an image of something which is completely unreal. This helps the media, as we are able to portray and use these images to gain attention towards a subject or to interest memebers of the public from a basic picture.